Archive for the ‘“Recipes”’ Category
Posted by terrepruitt on March 22, 2012
It is important to eat breakfast. I don’t always have a chance to eat before my Nia class, but I have been looking to try to change that. Oatmeal is always touted as being one of the best breakfast foods. I do not like oatmeal. I used to not like granola, but I have found a few I like, but most often than not they have canola oil in them so I have been looking for recipes where I can make my own. I found a recipe that looked simple and quick and had ingredients I could live with. Oats is a main ingredient in granola so I can get my whole grain oats in granola instead of oatmeal.
Do you ever wish that you would have followed your instincts? The first time I make a recipe I follow it. Then after I make any adjustments. Well, with this one I made a few measurement adjustments and as I was cooking it, I had a feeling that I should also make some procedural adjustments, but I didn’t. I thought, “No, I will do what it says and it will turn out fine.” Honestly it DID turn out fine if you want crumbly granola and that is what this recipe is. So had I really thought about it I would have realized that I wanted more like bars.
I am not sure where I got this little booklet from but the recipe on the website is a little different from the one in the booklet, but that is the beauty of it you can add whatever you want to your granola. I opted for plainish because that is one of the things I don’t like about granola and granola bars they often have dried fruit in them. I don’t like dried fruit.
I altered the recipe to be:
 Granola:
3 1/2 to 4 cups rolled oats
1/3 cup olive oil
a little over 1/4 cup raw honey
1/4 cup brown sugar
2 teaspoons vanilla
a round heaping 1/4 teaspoon of cinnamon**
1/2 teaspoon of salt
2 1/2 cup roasted almond slivers
(you can add in anything you’d like)
Line a large baking sheet with parchment paper. Preheat oven to 325 degrees F.
Mix together the oil, honey, brown sugar, vanilla, cinnamon, and salt.
Pour over the oats and mix well.
Spread the coated oats onto the baking sheet. Stir every 5 minutes. Bake about 20.
Then let cool completely then mix the oats with your add-ins. Store up to 2 weeks.
Well, I will probably use less salt or omit it all together (YES! ME, saying I will use LESS salt or remove it all together . . . . hmmmmm . . . . ) And I will cook it less than I did. I think I cooked it for more than 20 minutes. I won’t do that, but it didn’t look like it was cooking at all. I will put my add-ins BEFORE it cools, maybe even before I bake it. Depends on what they are.
I am also going to try using less oil and sugar.
Anyway, this is a granola recipe I like — finally– after I made my own adjustments (I use olive oil instead of canola and more oats). With this recipe after a bit more tweaking I can experiment with anything now. Now that I have a really simple basic recipe I can go from here . . . . or not. I is really good on its own. I can see having it warm as a hot cereal. Not quite making it oatMEAL, but making it a meal of oats. 🙂
Do you like granola? Do you like oatmeal? Do you eat oatmeal? What type?
**As I was making this today and using my posted recipe I realized I typed this incorrectly! It is NOT a full teaspoon of cinnamon, but a 1/4 of a teaspoon!!!
Posted in "Recipes", Food, Oats | Tagged: Canola Oil, dried fruit, eat breakfast, granola, granola bars, granola recipe, hot cereal, Nia, Nia class, oatmeal, oats, whole grains | 8 Comments »
Posted by terrepruitt on February 16, 2012
If you’ve read a few of my “recipes” you have probably figured out one of my go-to meals is ground turkey. It is so easy to cook with and to make into almost anything, using any flavor. I cook it with whatever vegetable I have around or new one I want to experiment with. I usually start by sauteing an onion then I add food accordingly. I find that most of the time I need to cook at least one of the veggies first. I feel some vegetables need to be cooked more than turkey, like mushrooms. But broccoli is one that gets added when the turkey is almost cooked. My latest veggie to add to my turkey is a leek. I was in Campbell this weekend signing the studio contract where I am going to have my new evening Nia Class and the city of Campbell has a great farmer’s market. While I was walking down the aisle I saw leeks and I thought, “I should add that to the turkey.”  So I bought one. I have never cooked with a leek before. I was thinking I would saute a little bit of onion then put the leek in then saute it then add the turkey. But when I chopped up the leek it smelled so onion-y I decided I didn’t need to use an onion. I mean leeks do belong to the same family as onion and garlic. After cooking the turkey until it was almost done, I added some broccoli. When the broccoli was almost done I added a couple of tablespoons of whipped cream cheese with chives. The leeks have such a great flavor I loved them. I am going to cook with them more often.
According to WHFoods vegetables in the same family as leeks, such as onions and garlic supply their nutrients better if they sit for about 5 minutes after cutting before cooking. Furthermore since they all belong to the same family leeks have many of the same health benefits.
Leeks have a lot (over 50% of the daily value) vitamin K. They also have a large quantity of vitamin A. They contain vitamin B1 (thiamine), vitamin B2 (riboflavin), vitamin B3 (niacin), vitamin B5 (pantothenic acid), vitamin B6 (pyridoxine), and vitamin B9 (folic acid). They also have a flavanoid shown in research to help protect our blood vessel linings from damage. Leeks also contain compouds that convert to allicin and this has been shown to help relax blood vessels by producing of nitric oxide (NO). With all this good stuff they do for our blood vessels it seems logical they will add to cardiovascular health.
Since leeks are so onion-y for me it will be easy to include them in our diet either cooked right into our food to add an additional layer of flavor and nutrition or even chopped and raw. We can add them to our kale salads or throw them in with our quinoa. I am definitely going to add them in my soups. I think the more vegetables I add to our soups the better.
I really was impressed with the flavor that the leeks add to this dish. I thought they were amazing!
(I took this picture to post to Streamzoo just to show our dinner fixings. I didn’t know I was going to post about leeks until I tasted them and loved them. the leeks are the green things chopped up on the right.)
Do you include leeks in your diet? How? Do you cook them? Do you eat them raw?
Posted in "Recipes", Food, Vegetables | Tagged: Campbell in Nia, cardio class in Campbell, flavanoids, folic acid, Kale, leek nutrition, leeks, Nia, Nia Campbell, Nia class, Nia class in Campbell, nitric oxide, NO, quinoa, vitamin K | 13 Comments »
Posted by terrepruitt on January 28, 2012
 I spent a large portion of the day practicing Alive, it is the Nia routine I am starting to teach. I debuted it Friday, but I need to practice and practice. In Nia we say, “tight but loose”. So I need to know the music and choreography to perfection which allows me to dance with it and play to it is loose and flowing and fun to my Nia students. So practice and play is the key. I was so busy having fun with it I didn’t have a lot of time to come up with a blog post. Because I also spent some time in the kitchen making a different version of my Baby Bok Choy and Spinach Soup recipe. The people I made it for convinced me that it was good enough that I could use my adaptation of my Baby bok choy and spinach soup recipe as a post. So here goes.
Parsnips, Broccoli, Baby bok choy, and Spinach Soup
–olive oil
–1 medium sized onion chopped (save some for garnish)
–2 parsnips (chopped)
–1 bunch of broccoli (chopped)
–4 bundles of baby bok choy (bottom portion separate from leafy portion, chop both and leave separate, they are added to the soup at different times)
–2 or 3 tsp of minced garlic
–1.5 tsp granulated garlic
–1.5 tsp garlic salt
–48 oz of chicken broth
–a half of bottle or can of beer
–shake or two of teriyaki
–small piece (3/4 of an inch) of ginger, chopped
–3/4 of a 6-oz bag of spinach
–1.5 (ish) wooden spoonful of cream cheese spread whipped with chives
Sautee chopped onion in the olive oil. When the onions look tender add in the chopped parsnip, add granulated garlic and garlic salt. Cook parsnip until it seems a bit tender, then add the bottom portion of the bok choy and broccoli. Let it cook a minute, then add the minced garlic. Sautee until tender. Then pour in the broth. Add about a half can or bottle of beer and the few splashes of teriyaki. Stir it as you feel necessary throughout the entire process. Bring to boil. Add the cream cheese if you are going to use it. Add the ginger. Add leafy portion of the bok choy and bag of spinach. Let cook for a few minutes or until the veggies are wilted. Once the veggies looked wilted use the blender to mix it all up. (I use the immersion blender so I can keep it all in the same pot. Please remember to be cautious of the steam.)
The parsnips give this a little difference flavor and the broccoli leaves little green specks in the soup no matter how much you blend it. Actually when you look at it, it looks the same as all the other soup I make. But it tastes different.
I was trying to make something easy to eat for someone with a sore throat. This soup is kind of thick yet easy to swallow and it packs a punch with all the vegetables it contains. Thank you so much for taking the time to read this and let me to continue to share my soup experiments and at the same time put spending time with friends and family at the forefront of life!
Enjoy!
Posted in "Recipes", Food | Tagged: baby bok choy, beer in soup, broccoli, family time, garlic, immersion blender, Nia Music, Nia routine, Nia routine Alive, Nia students, Nia Teacher, parsnips, soup recipe, spinach, teaching Nia, vegetable soup, veggie purees | 6 Comments »
Posted by terrepruitt on November 22, 2011
Yesterday, after my Nia class in Central San Jose, I went to Campbell to pick up some locally “grown” honey. It has been pretty cold here so I have been drinking tea and I was thinking soup. It was at the last minute and through a chance of “well this light is green so I will turn this way” that I ended up at Trader Joe’s. I don’t get to Trader Joe’s often because it is just not in my regularly traveled areas. I didn’t know what I was going to get there until I saw the package of cut butternut squash. Then I was on my phone trying to find the recipe so I could make certain I got all the ingredients for butternut squash soup.
I have made this soup at least twice before, but the last time I made it I put too much pepper in it. Probably not even as much as the recipe calls for, but it was WAY too hot for me to eat. I was soooooooo disappointed. But at least it didn’t go to waste because my hubby loves spicy hot food so he ate it.
I remembered from the times before that one package of cut butternut squash is about 6 cups of squash and that is what the recipe calls for. With Thanksgiving coming I thought that we could just eat it all week if I doubled it. I am fortunate in that my hubby doesn’t mind eating the same thing over and over. So my plan was to make a double batch. But my plan was also to not follow the recipe exactly.
Before I had made it the very first time, I had read the reviews and I believed what the majority of them said so I was already adapting, but I was even thinking of more modifications. The problem is I don’t always know what I am going to do until I do it. As I am cooking an idea will pop into my head and then I don’t always remember what I did when it comes out great. I thought to write as I cooked but I didn’t.
After I sat down to eat it though I decided I had to make note of what I did because to me and for me, this is the best batch I have made and I want to make it EXACTLY like this from now on. Please excuse me for being brand specific. Normally I like to be more Rachel Ray than Martha Stewart, and I will say use whatever, but for me, I am going to use these exactly ingredients to make this soup. I really think that these particular flavors are what made it so yummy. But you of course are free to use the brands and flavors you like, but if you don’t want to lick the pot when you are done than it really might be the brands. 😉 I would have taken pictures of the cooking process had I thought I was going to post about this.  I had thought NOT to post, but then after I ate it, I realized I HAD to post just so I would have record of it. The pictures of the products are after I fished the packages out of the garbage.
Butternut Squash Soup Adaptation
Two packages Trader Joe’s cut butternut squash (2 lbs each)
Olive oil spray
salt
4 tablespoons butter
1/2 cup chopped onions
1 box (32 oz) Trader Joe’s Low Sodium Vegetable Broth
4 packages Trader Joe’s Savory broth – chicken flavor
3 1/2 cups water
1 tsp marjoram
6 turns of the smoked pepper pepper mill
two light sprinkles of cayenne pepper
1 8 oz package cream cheese
2-3 tablespoons of whipped cream cheese
 Heat the oven to 450. Spread the squash on a pan or two, spray with olive oil, sprinkle with salt. Roast the squash. The goal is to cook it until it is soft, but it is nice to have some of it browned. Roast for at least 30 minutes. Flip, stir, or shake so as to move the squash around a bit. Here is where you decide how roasted you want your squash.
Melt the butter in the stockpot, add the onions, and a little salt. Cook the onions until tender. Put the roasted squash in the pot, add the box of broth, add the water, add the contents of the broth packages, add the marjoram, add the pepper, sprinkle the cayenne. Bring to a boil.
Take the pot off the burner and blend the soup until smooth. (I use the immersion blender). Add the cream cheese. Stir. Blend until the cream cheese is full incorporated in the soup. Depending on how long it takes you to blend the soup and how hot you want to serve it. You might have to put it back on the stove.
This recipe makes a nice creamy squash-flavored soup. It is not sweet, but it is not spicy hot. If you like spicy hot you can add more pepper. The actually recipe on Allrecipes.com calls for a 1/4 teaspoon ground black pepper and a 1/8 teaspoon ground cayenne pepper. That is too hot for me. I just put a few twists and a sprinkle. The thing about making the pot mild is that people can add their own heat. My hubby sometimes adds hot sauce. But then sometimes he doesn’t. He can decide.
As with any recipe, of course, you can modify it as you want. But for me THIS IS IT! Also as with anything, I would love to hear what you think.
Posted in "Recipes", Food | Tagged: butternut squash soup, Campbell California, cayenne pepper, cream cheese, hot soup, Martha Stewart, Nia, Nia class, Nia San Jose, Rachel Ray, roasted butternut squash, San Jose Nia, San Jose Nia class, Thanksgiving, Trader Joe's | 6 Comments »
Posted by terrepruitt on November 12, 2011
I have been slowly learning a new Nia routine. I worked on it this morning then right before dinner I decided to do a few of the katas that I are challenging me. I knew that dinner would be easy because it is FINALLY soup weather in San Jose, California and I made Chinese Dumpling Soup last night and I was just going to add a little more broth. Well, I ended up adding a little more than that. After I first had this soup, which I first mentioned in my Ginger post, I wanted it again. I made it once and I wanted to post about it then because it is so good. But normally I only like to post recipes when I made adjustments so it can be more like my own and not like I am just copying someone else’s recipe, but I really haven’t made any adjustments to this soup. It is so good. This time I did add some mushrooms. Ya know, have you ever had that soup at a Chinese food restaurant with paper-thin mushrooms in it? That is what I was thinking of so I sliced some mushrooms and put them in the original cooking and them more tonight when I added more broth and more spinach. This soup has so many flavors going on it is really a wonderful thing. I am going to make it and eat it without the dumplings (pot stickers). My hubby doesn’t want me to omit the pot stickers, but it is such good soup he will forgive me. I know he will.
Chinese Dumpling Soup
Ingredients
8 cups water
8 teaspoons Better Than Bouillon low sodium chicken bouillon
2 inch piece fresh ginger, peeled and chopped
1 tablespoon soy sauce
1/4 cup rice vinegar (although you can use sherry, which I am sure I will have to do one day)
1 tablespoon balsamic vinegar
2 teaspoons sesame oil
1 teaspoon sugar
sprinkle of salt
about 1 cup Julienne baby carrots
24 frozen Chinese dumplings
3 scallions (white and green parts), thinly sliced
4 cups bag baby spinach
Directions
Heat the eight cups water, stir in the 8 teaspoons of bouillon. Add the ginger, soy, wine, vinegar, sesame oil, and sugar. Bring to a boil. Lower the heat and let simmer for about 10 minutes.
Add the dumplings and cook for about 5 minutes. You might want to adjust the heat up a bit since the frozen dumplings will bring the temperature of the liquid way down.
Add the carrots (I like them crunchy). Turn the heat down a bit and cook for about two minutes.
Then add the spinach, sprinkle the salt in, and add the scallions. Let the spinach wilt, about a minute.
Get your taste buds ready for some super yumminess and serve.
 Well, now that I have typed it up, the directions on the site are a bit different than mine, I am sharing with you the way I do it. But basically it is from the Food Network Cookbook and website. I don’t like my carrots really cooked so I add them after the dumplings where the site and the book say to add them before and cook them longer. The site also suggest cooking the soup without the pot stickers and just have them on the side. That is what I am going to do. If my hubby wants them in the soup he can put them in there. The way I cook them added them to the soup would add ANOTHER layer of flavor and probably make it better anyway.
The soup is really, really, really easy and without the dumplings is has to be really low in fat. With the spinach you are getting a good amount of greens. YUM. This soup is really good. One of those foods that has you thinking about it.
Well, the recipe this book came from is from a book I bought for my friend and she has made a few recipes in it for me and they have been really good. I would recommend this book to anyone that likes to use cookbooks. What made me get it for her is that there were simple recipes in it (she has kids) and because it shows “additional uses” for some of the ingredients you might not know what to do with. If you buy a can of tomato paste and use two teaspoons, it shows you other recipes in the book that also use tomato paste. I thought that was so cool because I often end up with leftover ingredients. As it turns out I love this book because it has this soup recipe in it and I love this soup.
I hope you will try it and enjoy it too. If you do let me know what you think.
Posted in "Recipes", Food | Tagged: better than bouillon, Chinese Dumpling Soup, Chinese soup, easy soup, Food Network, Food Network cookbook, ginger, low fat soup, Nia, Nia California, Nia katas, Nia routine, Nia San Jose, pot sticker soup, San Jose Nia, soup weather, spinach | 4 Comments »
Posted by terrepruitt on September 13, 2011
I saw a recipe for roasted chickpeas and I thought it would be good. I can’t remember where I saw it, but I know that I wanted to do it. Then I was reminded of them when I saw it mentioned on ONMYWAYTOHEALTH. She has a link to another blog with the recipe with step by step pictures. All the recipes I have seen are basically the same.
A can of chickpeas
between 1 1/2 to 2 tablespoons olive oil
salt
garlic powder*
While the oven is preheating to 450F, drain the can of chickpeas, also know as garbanzo beans.
Rinse the beans off. I heard the better you rinse beans the less they might cause heartburn and/or gas. So rinse them well.
Then most recipes say to dry the beans off, the instructions suggest using paper towel.
In a bowl mix the beans, oil, salt, and garlic. Then spread the beans on a baking sheet and cook for about 40 minutes. Most recipes say to watch them so they don’t burn.

——————————————————
Well, ok, so are you ready for my version or at least what happened when I did it? TWO cans of chickpeas. I used two 12 ounce cans because one can is not that many. I didn’t dry them off very well, which might explain the way they cooked, but first, I think that drying them off is to help them roast and I figured they would get dry in the oven. So I drained and rinsed and sort of dried. I put them on the pan then sprayed olive oil on them. I don’t think it is really necessary to use a bowl, but that is personal preference. I used garlic salt, garlic powder, and season salt.
*I have seen so many recipes for them so basically use what you want. Use what spices you like. You can make them hot and spicy, or just really flavorful. You can add herbs. You can make them sweet. They can be flavored with whatever you’d like so go hog wild. I am going to try all different types of spices.
I would advise you to check on them while they are cooking because mine popped. Some of them popped off the pan onto the bottom of the oven. A couple landed near the element and I don’t know if it would have started a fire, but it sure start to stink. It was not a nice smell so I opened up the oven door to see what was going on and one popped off the pan. I was kind of afraid they were going to continue to do that. I didn’t see anything about that in any recipe.
Also . . . now this is where the drying might really be key, I don’t know because my oven does not cook evenly, but some of them cooked perfect and some did not. All the recipes I saw warned against burning so I was a little paranoid so when I saw the ones on the edge getting really crispy I figured they were all done since it had been 40 minutes. Well, the crispy ones are really good. My husband kept saying, “CornNuts!” And I kept saying, “Yeah, good comparison. Awesome. I love CornNuts.” He would say, “CornNuts.” And then I would say, “I know, right? Cool.” He finally said he is not really a CornNuts fan. Ha, ha. I am. So the crunchy ones are really, really good and they do taste somewhat like CornNuts. But the ones that aren’t crunchy are kind of odd. They are kind of like a stale cracker or something. Not quiet soft, but not crunchy. I obviously need to work on the cooking of them. I had them in as long as the recipe said to cook them, but that was not enough for some of them. Increase the time because of two cans? I might just have to scoop off the ones on the edge.
I really love CornNuts, but they have ingredients in them that I am avoiding so I don’t buy them. This is a great alternative. And just like CornNuts they can be made with any flavor. I can’t wait to make more. So what should I do next? What about you? What will you do? Try it, they are a great snack. Beans are good for you!
Posted in "Recipes", Food | Tagged: beans, easy snack, easy snack recipe, fiber snack, olive oil, popping chickpeas, protein snack, quick snack, roasted chickpeas, roasted garbanzo beans | 16 Comments »
Posted by terrepruitt on September 8, 2011
After I taught my Nia Class in Willow Glen I had some shopping to do. After shopping I rushed home because I was going to meet a friend in the afternoon back the way of my class, but I thought would shower so as not to offend her. It was pretty warm here. As is normal for a hot day, the late afternoon early evening is the hottest. So as I was driving home from my visit I was not looking forward to cooking dinner. I had chicken thawed in the fridge, but what else to cook? I ended up visiting longer than I had planned and getting stuck in traffic on the way home so I didn’t want to stop to get anything to add to dinner because it was already late. All the way home I was wondering what to cook. When I got home it was really hot. I thought it would be best not to turn on the oven or the stove. I had an idea that maybe using my electric skillet would be cooler. I do believe it was. Although this is a common dish cooked in a crock pot or the oven. When you have limited ingredients sometimes dinner is really easy. I have found that with limited ingredients I come up with come pretty good meals. Some end up being regularly cooked meals.
Ingredients:
-A little over a cup of rice
-32 oz broth
-1/2 cup of sherry
-1 tablespoon of worchestire sauce
-1/2 tablespoon soy sauce
-1 tablespoon marjoram
-1/2 tablespoon powdered garlic
-two large chicken breast (skinless, boneless)
-bag of green beans
-salt and pepper to taste**
I put the rice in the skillet with about half of the broth and turn the skillet on to its highest setting. I started to cut up the chicken into bite size pieces. When most of the broth boiled off, I added the rest of the broth, the sherry, the worchestire sauce, the soy sauce and stirred, then I added the marjoram. I turned the heat down to the lowest setting. I finished cutting up the chicken, then put it in with the rice I sprinkled the garlic on the chicken with some salt. I turned it to the middle setting. I let the chicken cook until it was almost done, then I added the green beans. I stirred them into the dish and let it cook until they were done.
If you know me, you know I don’t like pepper — at all. But my friend gave me some smoked pepper, which seems very different than regular black pepper. It helped finish the dish off perfectly! I brought the grinder to the table though so we could pepper our food separately. My husband loves pepper.
I wasn’t planning on posting about this so I wasn’t keeping track of the time, but I think it all took about 30 to 40 minutes. That is what I will plan on in the future, but I will keep an eye on it to see. I am looking forward to using different veggies. Frozen green beans is all that I had.
The last time I cooked an all in one dish I used the oven and I used brown rice and canned soup. The rice was a bit crunchy still but I didn’t want to cook it longer because the chicken was done. So that is why with this one I started the rice first, although this time I used white rice and it could have been less done.
I am working my way away from using canned soup so that is why I used broth and it came out great. With the oven cooked dish I used broccoli. I am looking forward to trying different veggies in the skillet.
I had forgotten about the electric skillet even though my parents use theirs all the time. I am glad it was hot and I was at a loss of how to cook dinner because now I am going to start using my electric skillet more often.
Do you have an electric skillet? If you do, what do you cook in it? Do you have any favorite one pot recipes?
**09/10/11 — This actually made quite so we ate it a second night. On the third night it seemed as if all that was left was rice and green beans so I sauteed some baby bok choy and a can of chicken then put the left over rice and green beans in the pan and heated it up. Wow! I think I am a fan of baby bok choy!!!
09/12/11 — I didn’t take a picture while I was cooking it because I didn’t think of posting about it. So the next night when we were having it for dinner I decided to at least take a picture of the food and the electric skillet, even though the food is on my dinner plate. 🙂
Posted in "Recipes", Food | Tagged: baby bok choy, bok choy, broth, canned soup, chicken dinner, easy dinner idea, easy meal, electric skillet, electric skillet recipes, green beans, Nia, Nia class, Nia in Willow Glen, Nia San Jose, one pot chicken meal, San Jose Nia, San Jose Nia class, smoked pepper | 14 Comments »
Posted by terrepruitt on August 27, 2011
I would not be surprised to learn that I was one of the last people to learn about beer bread. This past June I was at my mom’s and she said she would whip up some beer bread. As much as I love bread I have never tried to make it because, yeast is a scary mystery to me. So I was curious as to how she was going to “whip” it up. I knew that to mean quick and not whipped like whipping cream so I wondered how that could be done. Yeast has to set, right? She and my niece did it and I was amazed and thrilled. It is so easy. There are really thousands of sites on the internet that have beer bread recipes. I found that out when I went looking for recipes that call for “self-rising” flour.
 Most of the recipes — the easy ones are 3 cups of self-rising flour, 3 tablespoons of sugar, and 12 ounces of beer. Bake at 375°F for about an hour. The first time I made it I actually handled the dough too much and I think it came out tough. I had mixed it a lot then, had a hard time putting it in the pan. It kind of sticks to whatever you use to try to push it to the corners of the pan. Then AFTER I had spent some time fitting it into the pan I realized I should have greased the pan so I popped the dough out, greased the pan, and spent a considerable amount of time getting the dough back into the corners. Kinda made it tough.
The next time I was careful NOT to play with the dough so much. And it came out better. Plus I used less sugar. I know it is only three tablespoons, but it makes the bread too sweet for my tastes so I probably used about a tablespoon less. I added salt (yeah, I did), garlic, and cheese. I used Asiago because that is what I had and I wanted something with a gentle bite to it. It turned out REALLY good.
I am not sure if I made it again before this very last time. Hmmmmm . . . . can’t remember. I don’t think so. Even though I love bread, my hubby is not so much the bread fan, so that means I end up eating most of it and I don’t need to do that. Even though I love that fact that there are less chemicals and stuff in this bread it is still an uber refined carb and I can always use to eat less of those!
This last time I made it with two tablespoons of sugar. I have yet to pour the butter on top as most recipes instruct. My hubby and I usually put butter on it so I don’t feel we need to have double butter. In this batch I used garlic salt, garlic powder, and marjoram. I love marjoram. So I sprinkled some into the dough. It is good. It could even do with more marjoram. I just wasn’t sure so I did use a lot, but now I know it works I can put more in. You can barely see the flakes in the bread.
I still want to try it with other herbs. Or maybe even a heavier beer? And definitely even LESS sugar. I might even try eliminating the sugar all together. Since this really is a well-known recipe and I am thinking many of you have made it, what have you used? Have you added any other herbs? What typed of beer do you use? Have any of you tried it with a gluten free flour? Does it work?
Posted in "Recipes", Food | Tagged: beer, beer bread, bread, bread recipe, easy recipe, garlic bread, herb bread, herbs in beer bread, marjoram, refined carb, self-rising flour, sugar, yeast | 2 Comments »
Posted by terrepruitt on August 25, 2011
 I was thinking one day, “there has to be something online that can give calories for a recipe. And hopefully there is a free version.” There is. Cool. Maybe you had thought about this before, I know I have, but I just rememberd this week. I usually just kind of tally the ingredients and divide using a calculator, but I realized there has to be something online so I Googled it and came up with a few.
FitWatch Recipe Analyzer lets you label the recipe and then you input the number of servings, then you enter each ingredient separately. You can enter all the ingredients on its own separate line, then click “Search For All Ingredients” or you can search as you go along after you enter each ingredient. After you click “search” the program will bring up a list of ingredients from which you can scroll down and select the one you want. After each selection the screen flashes and then gives you measurement options. Each time you make a selection the screen flashes. There are only twelve spaces, so you can only enter up to twelve ingredients. After you are done it supplies you with amount of calories, water, carbohydrates, protein, total fat, monounsaturated, polyunsaturated fat, and saturated fat, cholesterol, and dietary fibre. It also gives you a breakdown of vitamins and minerals measurements. Very nice. Also gives you the option to print it in a nice format. But the input is somewhat awkward, because of the constant flashing. I kept thinking my computer or internet browser was going out or down. Took me until about the eighth ingredient to get used to it. Then I skipped an ingredient and I wanted them to be in order because I was not sure what information I would get and I didn’t know the format, so I thought it would be easier to just have it in the same order as the recipe. Going back and inputting the ingredient again really made the screen flash.
 Calorie Count has you input the number of servings, then you can copy the entire list of ingredients into one box. That was so quick and easy and AWESOME! Then it gives you the calorie break down of each ingredient and gives it a grade. It allows you to add a new item and edit the recipe. It gives the option to log a serving and save a recipe, but I am not signed up so I didn’t do either one of those things. So I am not sure if after having done one of those things if you get an option to print. The format the nutrition info is presented in does not copy and paste very well. In addition to the calorie count and grade of each ingredient it gives you the Nutrition facts in the common format that is on many product labels. Under the “label” it gives you a nutritional analysis such as “Bad points: •High in saturated fat •High in sugar •Contains alcohol” and “Good Points: •Low in sugar •High in manganese •High in niacin •High in phosphorus •High in selenium •High in vitamin B6”. But it does not give you measurements nor percentages on all of the things mentioned in this analysis.
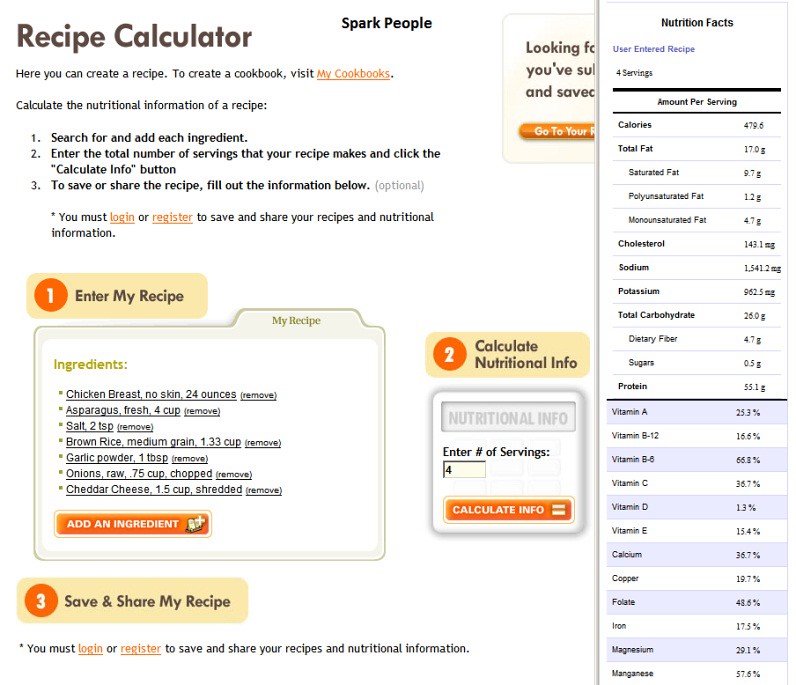 Spark People’s recipe analyzer makes you enter each ingredient and then search their data base for the closest match. Its breakdown of the nutrition in the recipe includes: amount of calories, total fat, monounsaturated fat, polyunsaturated fat, and saturated fat, cholesterol, sodium, potassium, total carbohydrates, dietary fiber and sugars, and protein. This recipe analyzer/calculator gives you a breakdown of vitamins and minerals in percentages. Its nutrition information is in a printable format like the first one. This site also allows you to save the recipe if you are a member as with Calorie Count.
Really nifty. I bet there are even more out there. This is a different way of checking the nutrition in our diet, instead of inputting it all in a food diary/log/tracker/counter, you can do entire recipes. I want to remind you even though I say it often, we all have different goals so we certainly have different nutritional needs. These sites are just more tools that we can use to meet our goals and our nutritional needs.
So, I am curious to know if you were surprised at the information after you entered your favorite recipe? Well, were you?
Posted in "Recipes", Helpful Hints | Tagged: Calorie Count, calorie counter, calories, cholesterol, dietary fiber, fitness goals, FitWatch Recipe Analyzer, health goals, minerals, monounsaturated fat, nutritional needs, polyunsaturated fat, Potassium, protein, recipe calculations, recipe calculator, recipe nutrition, recipe nutrition analyzer, recipe nutrition information, saturated fat, sodium, Spark People, total carbohydrates, total fat, vitamins | 4 Comments »
Posted by terrepruitt on August 13, 2011
This recipe allows you to use up the over ripe bananas without having to resort to banana bread. Although these taste pretty much like banana bread, but lighter, more airy. While the large amount of butter seems to make these anything but a low-fat cookie, I find that they are very satisfying so I don’t gobble down an entire half-dozen. If you break it down it is about 1/8 of a tablespoon per cookie. It is a cookie and like all cookies, they are meant to be a treat. I think that the bananas, the oats, and the walnuts add a bit of nutrients to them. I think anytime good-for-you ingredients can be added to a sweet treat it is a great thing. Homemade is better than packaged goods.
 Banana Oatmeal Walnut Cookies
Ingredients:
3/4 cup of butter
1 cup sugar
1 egg
1 teaspoon of vanilla
1 cup wheat flour
1/2 cup white flour
1 3/4 cups oats
1/2 teaspoon baking soda
1 teaspoon salt
¾ teaspoon cinnamon
A sprinkle of nutmeg
3 bananas
Chopped walnuts
Preheat oven 375 degrees
Using an electric hand-held beater, mix up the butter and sugar. I mix it up until it is fluffy.
Then, add the egg and vanilla. Mix well. This I mix until it is light and fluffy. (I think that is what helps make the cookies lighter than banana bread.)
Add the rest of the ingredients (except the nuts) one at a time. Blending well – using the electric hand-held beater – after adding each one and before adding the next.
Stir the walnuts in using a spoon or whatever. I just wouldn’t use the beater.
The “dough” is rather runny for me at this point. I use a round measuring spoon to scoop up the mixture and put it on a cookie sheet.
I don’t grease the sheet, but I think that really depends on what you are baking on. You can decide. I do space them out rather far because they tend to grow a little bit.
I bake them at 375 degrees for 12. I bake them for 6 minutes, then I turn the pan. And bake them for another 6 minutes, for a total of 12 minutes. Again, you decide how “DONE” you want your cookies, plus you know your oven. So maybe start out with 10 minutes and add minutes accordingly. And if you have greased the cookie sheet the time might need altering.
I think I get about 4 dozen out of this recipe.
________________________________________

I am going to keep this version of the recipe, but also do some alterations sometimes when I make them. I have some ideas I want to try. I want to try LESS butter. I also might try the chocolate chips again, but maybe less of them (I only used ¾ of a cup the first time!) and maybe WITH nuts, oh (!) and with my nutmeg addition. That might make a big difference. But I somewhat agree with my husband about adding chocolate chips to a cookie, it just makes it a chocolate chip cookie.
I want to let you know the path that led me to making this recipe. First I went looking for recipes and ideas on what to do with over ripe banana and I found 100 Things to Do with a Banana (yeah, really). Since they have pictures I just scrolled through clicking on pictures I liked and it led to A little bit of this, a little bit of that .
So, what do you think? Are you a chocolate lover? Then you might want to add a cup or so of chocolate chips. What else can you think of to make this better? Let me know. I am always interested in hearing about alterations.
Posted in "Recipes", Food | Tagged: 100 Things to Do with a Banana, a little bit of that, A little bit of this, banana bread, banana cookie recipe, banana cookies, banana oatmeal walnut cookie, chocolate chip cookie, chocolate lover, electric hand held beater, homemade, low fat, oat cookies, oatmeal cookies, over ripe bananas, ripe bananas, sweet treat, walnut cookies, wheat flour | 9 Comments »
