Archive for the ‘Helpful Hints’ Category
Posted by terrepruitt on September 3, 2011
I’ve talked about resistance bands being great for strength training. The other day after having taught a Nia class with a lot of sumo stances in it AND after having done some weighted squats, I really needed to stretch. I needed a really deep stretch and as I was trying to think of how to get it I remembered I could use my resistance bands for stretching. The resistance bands I have are long flat sheets of rubber. I don’t have the ones that are like rubber bands or tubes. Mine don’t have handles. Any type of band made for exercising will do. There are so many ways to stretch using a band. I will just name a few in this post and maybe do another post at another time.
The first one you probably have done when you pick up a band is just to hold it in each hand and let your arms “fall” to the side. Obviously your arms don’t actually fall because you are holding the band, but you can feel the stretch in your arms and shoulders. The great thing about bands is you can make the tension however you need it to be by the way you hold the band. If you need a really deep stretch make the band really short and either pull or let your arms “fall”. If you want a gentle stretch then hold the band closer to the ends.
Holding opposite ends of the band and allowing your arms to fall behind your body really allows for a stretch in the upper arms, shoulders, upper back and neck.
You can do side bends with an end of the band in each hand holding your arms above your head. Again sensing the stretch in your shoulders and upper back, but with this stretch you also get your sides. Using the band for this stretch allows for a much greater stretch than without the band.
For the legs there are a few I want to share. Sit down on the ground, fold the band in half then put your foot in the band at the fold, hold one side of the band in each hand. Then lay down, keeping your foot flexed, bring your straight leg with the foot in the band up as far as you can. Keep your other leg straight out on the floor. Adjusting the tension of the band gives you the stretch you need. You can bring your leg straight up and closer to your face for an even greater stretch. The closer you pull your leg to your face the greater the stretch in the hamstrings and even calf.
Still lying on your back with your leg up and still holding the band let your leg fall ACROSS your body. This is a further stretch for the hamstrings and gets the outer thigh. With this stretch – again – using the band to pull your leg closer to your head gives you a bigger stretch. Hold the end of the band in the hand opposite the direction your leg is going, while the hand on the side of where your foot is gently pulls the leg towards your head. Remember to be mindful of what you are sensing, often a stretch will cause discomfort but the muscles need to be stretched especially after a workout. But pain is different than discomfort, so be aware of what sensation is present.
Another stretch you can do is from the same position of laying on your back, with your foot through the band, leg in the air, foot flexed, but this time let the straight leg fall away from your body. With this stretch the hand opposite the side your stretching leg holds the end of the band and the hand on the side of the stretching leg can gently pull the leg towards your head. This stretch allows you to really sense the stretch in the inner thigh. The closer your leg gets to the floor the more your inner thigh gets stretch. And at the same time you can gently pull your leg towards your head enable the back of the leg to be stretched too.
Bands are such a great way to get some assisted stretching in without having to have another person there to help you. It is like proprioceptive neuromuscular facilitation (PNF) by yourself. As I mentioned before, please be mindful and aware of what your body is saying. Discomfort at a tolerable level is acceptable but pain is not.
Posted in Helpful Hints, stretching | Tagged: assisted stretching, deep stretch, exercise, exercise bands, gentle stretch, hamstring stretch, Hamstrings, inner thigh, Nia class, PNF, proprioceptive neuromuscular facilitation, resistance bands, rubber bands, squats, strength training, stretch, sumo stances, tubes | 4 Comments »
Posted by terrepruitt on August 25, 2011
 I was thinking one day, “there has to be something online that can give calories for a recipe. And hopefully there is a free version.” There is. Cool. Maybe you had thought about this before, I know I have, but I just rememberd this week. I usually just kind of tally the ingredients and divide using a calculator, but I realized there has to be something online so I Googled it and came up with a few.
FitWatch Recipe Analyzer lets you label the recipe and then you input the number of servings, then you enter each ingredient separately. You can enter all the ingredients on its own separate line, then click “Search For All Ingredients” or you can search as you go along after you enter each ingredient. After you click “search” the program will bring up a list of ingredients from which you can scroll down and select the one you want. After each selection the screen flashes and then gives you measurement options. Each time you make a selection the screen flashes. There are only twelve spaces, so you can only enter up to twelve ingredients. After you are done it supplies you with amount of calories, water, carbohydrates, protein, total fat, monounsaturated, polyunsaturated fat, and saturated fat, cholesterol, and dietary fibre. It also gives you a breakdown of vitamins and minerals measurements. Very nice. Also gives you the option to print it in a nice format. But the input is somewhat awkward, because of the constant flashing. I kept thinking my computer or internet browser was going out or down. Took me until about the eighth ingredient to get used to it. Then I skipped an ingredient and I wanted them to be in order because I was not sure what information I would get and I didn’t know the format, so I thought it would be easier to just have it in the same order as the recipe. Going back and inputting the ingredient again really made the screen flash.
 Calorie Count has you input the number of servings, then you can copy the entire list of ingredients into one box. That was so quick and easy and AWESOME! Then it gives you the calorie break down of each ingredient and gives it a grade. It allows you to add a new item and edit the recipe. It gives the option to log a serving and save a recipe, but I am not signed up so I didn’t do either one of those things. So I am not sure if after having done one of those things if you get an option to print. The format the nutrition info is presented in does not copy and paste very well. In addition to the calorie count and grade of each ingredient it gives you the Nutrition facts in the common format that is on many product labels. Under the “label” it gives you a nutritional analysis such as “Bad points: •High in saturated fat •High in sugar •Contains alcohol” and “Good Points: •Low in sugar •High in manganese •High in niacin •High in phosphorus •High in selenium •High in vitamin B6”. But it does not give you measurements nor percentages on all of the things mentioned in this analysis.
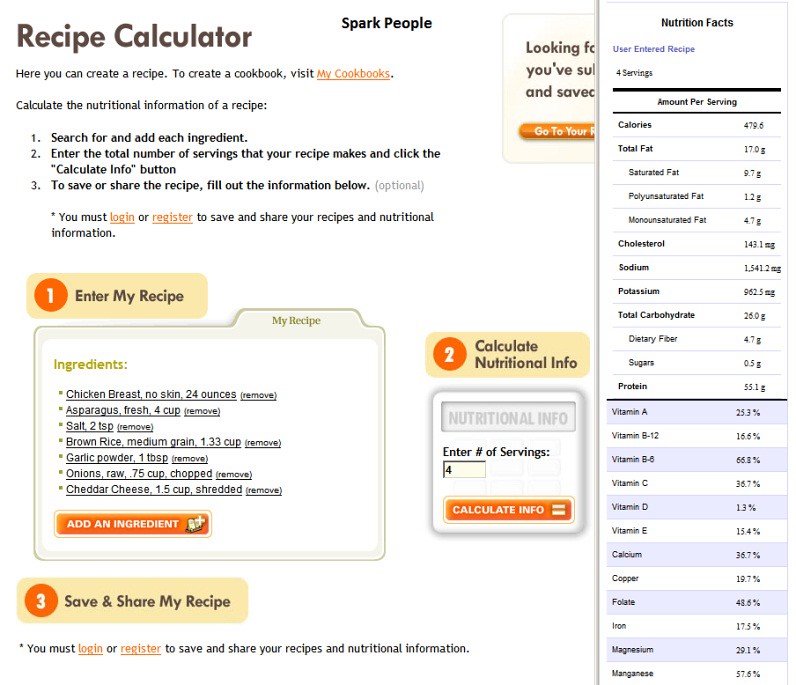 Spark People’s recipe analyzer makes you enter each ingredient and then search their data base for the closest match. Its breakdown of the nutrition in the recipe includes: amount of calories, total fat, monounsaturated fat, polyunsaturated fat, and saturated fat, cholesterol, sodium, potassium, total carbohydrates, dietary fiber and sugars, and protein. This recipe analyzer/calculator gives you a breakdown of vitamins and minerals in percentages. Its nutrition information is in a printable format like the first one. This site also allows you to save the recipe if you are a member as with Calorie Count.
Really nifty. I bet there are even more out there. This is a different way of checking the nutrition in our diet, instead of inputting it all in a food diary/log/tracker/counter, you can do entire recipes. I want to remind you even though I say it often, we all have different goals so we certainly have different nutritional needs. These sites are just more tools that we can use to meet our goals and our nutritional needs.
So, I am curious to know if you were surprised at the information after you entered your favorite recipe? Well, were you?
Posted in "Recipes", Helpful Hints | Tagged: Calorie Count, calorie counter, calories, cholesterol, dietary fiber, fitness goals, FitWatch Recipe Analyzer, health goals, minerals, monounsaturated fat, nutritional needs, polyunsaturated fat, Potassium, protein, recipe calculations, recipe calculator, recipe nutrition, recipe nutrition analyzer, recipe nutrition information, saturated fat, sodium, Spark People, total carbohydrates, total fat, vitamins | 4 Comments »
Posted by terrepruitt on August 9, 2011
 I have potholders and oven mitts that I don’t really want to use as potholders. Ya know, they could be those ones that you received as a gift and they are pretty, but when you use them and realize that they aren’t really as useful as they are pretty because you can still feel the heat/burn through it. Or you bought them as part of a set of hand towels, so they really are just for show because they are too thin to use. Why yes, you COULD get rid of them. But I would NEVER think to do that. (See my last post where I state I have a house full of stuff.) There are other uses for potholders. If they are really pretty but too thin to use to keep the heat away from your hand you can use them for other things. Or if you accidentally touched the oven element and just one little corner is singed you could use it for something else. Some times the pretty ones work very well as trivets. You might want to use them when company is over. You just set them out and then place the hot dish on them. Perfect. The slightly singed one can be used as a trivit too. It is really the surface that you are setting something hot (or even cold) on that you are trying to protect. It doesn’t have to be pretty.
 What they can also be used for is separating your pots and pans. There are protectors specifically made for that. I have some of those too (that is what the blue one is on the bottom), but I have a lot of potholders that have come with towel sets that aren’t that great as potholders. I also have a few that I have connected with the oven element with. In fact right after I took this picture one of the cat ones suffered that fate. So I use them to separate my pots and pans. I have found that along with the dishwasher the pots and pans scratch each other up a bit. So I put the potholders in between. I believe this annoys my hubby and I am sorry for that, because it really does help protect the pots and pans. I think having a glass top stove has made me a little more aware of what is on the bottom of my pans. A glass top is much easier to clean – to me – than a spiral element stove, but it helps if you start of with a pot/pan with a clean bottom. Also it shouldn’t have any rough edges or gouges in it that can scratch the glass. So I just like to use layer of protection between my pots and pans.
With the pots I try to get the pot holder to protect both the bottom of the pot and the handle. We have some pots with handles coated in a thin layer of plastic and the pot edges scratch it off. So I try to put the pots in with the potholder sticking over the edge. Works with big potholders, but not really the small ones.
So if you are like me and you wanna try to keep you pots looking nice and keep them smooth for the stove, you don’t like to throw “perfectly good things away”, and you like to find new/other uses for things this might be one of those things that helps you.
What about you? Any of you really crafty people have another way potholders can be put to use?
Posted in Helpful Hints, Misc | Tagged: glass top stove, new uses for old things, oven mitts, pan protectors, Pot holders, pot protectors, potholders, pots and pans | 4 Comments »
Posted by terrepruitt on July 30, 2011

 YAY! So happy I did it again. I had henna tattoos done in time for the Nia Jam. It had been way too long since my first henna tattoos. I have wanted to do it again since then. It just so happened that we were going to a party on Saturday night and the Nia Jam was on Sunday so it was the perfect time to get my feet done. It has been suggested that I need to love my healing foot more. Sometimes I don’t love it since it doesn’t work properly. I thought if I had henna done it would at least make me think it was pretty. I was right. Henna and Beyond does beautiful work so I think my feet look very pretty.
I had the henna done on Thursday afternoon. The henna can come off as soon as it is dried but the longer you leave it on the better the stain. The henna is squeezed onto your skin via a cone, like a small icing bag. As I mentioned in my post when I had henna done before, henna is applied and it rests on the skin like puffy paint would. It is best to leave it on your skin until dried. The longer you leave it on the darker the tattoo will be.
Rachna has printed information, but I didn’t want to take it and waste the paper because I pretty much knew what to expect. I read the information to be sure, then asked if it was on her site because I knew I wouldn’t be able to remember it exaclty. The lengths of time were a little different on the paper than that which are on the site, but they are just guidelines so you’ll have an idea of what to do. Both the paper and the website state that it is best to leave the puffy-like henna on for at least 2 hours. The paper said up to 12 hours. I am not sure why not past 12 hours, but it worked out that it was exactly 12 hours after having it done that I was ready to take it off. I slept with socks on so I wouldn’t get henna all over the bed. While not a lot of henna dropped off in the socks, I can’t say that it would not have in the bed. It could be that the socks kept it secure.
 When I got up I was able to brush most of it off with just my hand. The rest I just scratched off with my nails, although she recommends using the smooth side of a butter knife. The information says that 24 hours after it is applied it will be darkest. Hmmm? Here is a picture of mine about 26 hours after. The information also said to apply oil because it will make it darker. Really? Ok. It said any cooking oil would do, but I have some moisturizing olive oil, plus some Arnica Allay. I used both. I put the Arnica Ally on my toes and the olive oil on the rest of the art. I have applied it a couple of times. And here is what it looks like exactly a week later.
 I am happy. I think Rachna does a beautiful job. After looking at her books of samples I told her the designs I liked and the ones I didn’t and this is what she came up with. Brilliant! She free-handed all this and designed it as she went along.
I have also included a picture of what it looks like today. Which is a week and two days after having it done. You might notice that this time it is much darker than last time I had the henna tattoos. There are several things that could be the reason for that. One, I let it completely dry this time. Last time I did something very silly (so silly I will not even mention it here) thinking it would help keep the flaking henna from getting all over the place. What actually helps it from flaking all over is to let it dry and to not bump it off. It stays on pretty secure. Also, Rachna said that she now mixes the lemon and sugar* into the henna and so that could be another reason. And the oil, I really think applying the olive oil helped make it darker. In the pictures today I actually have a “coat” of olive oil them so they might even look shiny.
Yay! I am so happy. One of the reasons I had hesitated in doing henna tattoos again is I remember the henna flaking off and getting everywhere, but this time it didn’t. I am sure that has to do with me following her tips. I kept telling myself, “She’s been doing this for almost 30 years. I really need to trust she knows what she is talking about with all of her little tricks and tips.” And I did, and it is awesome!
*According to her website this is a mixture you make and apply that acts as a sealant.
Posted in Helpful Hints, Misc | Tagged: apply oil to henna stain, dark henna stain, flaking henna, Henna, Henna and Beyond, henna feet, henna skin, henna stain, henna tattoo tips, Henna Tattoos, Nia, Nia Jam, puff paint, Rachna, tattoo | 6 Comments »
Posted by terrepruitt on July 7, 2011
 While I was doing a Nia DVD today, I kept sensing some discomfort in my back. I have a spot, a muscle I guess, that sometimes becomes “whiny”. I think that particular spot on my back, directly next to my backbone to the right, right at the edge of my shoulder-blade, holds all of my stress and tension. When it came to the floorplay exercise portion of the Nia workout I was focused on my back. It was really getting my attention. I have had a student assisting me with my toe/foot and she often says she is “releasing it”. I wondered if I could touch my back and “release” it. So I did. I pressed on the spot that was speaking to me so loudly. It seemed to help. I believe in the power of touch. But since it is a place on my back that is needing touch it is not easy for me to get the entire area. While I was laying on the floor I was wishing I had a tennis ball to roll on.
Have you ever heard that? Using a tennis ball to massage your back. I had a friend who mentioned to me that she was told to put a couple of tennis balls in a sock and roll on them. You can roll on them against a wall or on the floor, whichever is most comfortable for you. I had heard to use the balls, but I hadn’t heard of the sock until she mentioned it. The tennis balls could be used to massage more than just your back, you could roll it under your legs or on your arms.
I don’t have tennis ball, but I do have a rather large “super ball”. I don’t know if that is what it is called, but that is what I remember we used to call them when I was young. You know those balls that bounce really well? It is a “The Incredibles” ball. It is kind of old so it is yellowed. It is also really hard. Much more hard than a tennis ball and a little smaller. I remembered that the last time I saw it I had used it for my foot and it was in the entertainment center. How convenient? It was right there. YAY!
At first I tried using it while laying on the floor. That didn’t work so well because it was difficult to roll on the floor without using my elbows which, in doing so, caused me to rise away from the ball. Plus the ball is really hard. So I used it with the wall. I leaned on the ball while it was on the wall. WOW! Awesome. I think the muscle that gets annoyed is small and there was almost a clicking sound as the ball rolled over it. That is how tight and grumpy it was. As I mentioned, I had used the ball on my feet before, it is a great foot massagerm just rolling it under my foot, but I hadn’t used it on my back. Glad I thought of that.
So what do you think? Have you heard of using tennis balls to massage sore muscles? Have you ever tried it? Do you use the sock method? Oh do tell, I would love to hear about it. It could definitely help with DOMS. What do you say?
Posted in Helpful Hints | Tagged: back discomfort, back massage, DOMS, floor exercises, floorplay, massage, muscle discomfort, muscle pain, Nia, Nia DVD, Nia exercises, Nia workout, sore muscles, sore muscles massage, tennis ball massage, tension in the back | Leave a Comment »
Posted by terrepruitt on March 31, 2011
 The doctor in my Nia Class had given me the homeopathic medicine, Trauma. I really liked it so I asked for more. She said that she likes Traumeel, so I agreed to try it. Both of them say they relieve the same things (muscular pain, sprains, pulls, and bruises). The first ingredient in the Traumeel is Calendula officinalis, which is the fourth ingredient in Trauma and it shows “Garden Marigold” in parenthesis. This ointment has a lot of the same ingredients as Trauma but they are in a different order. So this ointment is very similar to the Trauma.
It is a bit greasy and has a slight odor. I just put some of it on along with some Trauma for comparison. After I put the Traumeel on I had to wash my hand. It is not extremely greasy but just greasy enough that I can’t just rub it into my hand. I am actually not convinced it works as well as the Truama. It actually smells like medicine, somewhat like a band-aid, it is not a strong odor, but compared to the Trauma it is strong because Trauma has absolutely NO odor at all.
When I was talking to my Nia student about Traumeel she mentioned that they have an oral medicine that can be taken. My Nia friend mentioned it too, in the comments of the post regarding Trauma. I was able to find informatnoi on the internet, Trauma has an oral medicine too. I have not taken either medicine orally.
Posting about these products is my way of getting information to people. I am sharing my opinion on the products so that you can learn something about them and then decide for yourself which one you might be interested in using yourself if you are interested in homeopathic medicine. I also welcome my readers sharing what they know. Having readers comment and share is the best part.
I have concluded that I like the Trauma better. I feel it works, whereas I don’t get the same sense from the Traumeel. As stated in this post, I put them both on. I put the Traumeel on my knee (which gets tired from my odd gait) and I put the Trauma on my toe (foot and a few other toes). My toes and foot feel nice, but my knee feels the same. The Traumeel is a bit greasy, whereas I think the Trauma is more of a soft cream that actually moisturized the area I have used it on. I smell a slight odor with the Traumeel but nothing with the Trauma.
Have any of you tried them both? Any of you tried either? What are your thoughts?
Posted in Helpful Hints, Misc | Tagged: bruises, Calendula officinalis, Garden Marigold, homeopathic medicine, homeopathic ointment, muscular pain, Nia class, Nia student, pulls, sprains, Trauma, Traumeel | 2 Comments »
Posted by terrepruitt on March 29, 2011
There seems to be so many reasons one can get hiccups they don’t really know what EXACTLY causes them. What happens when you have the hiccups is the diaphragm contracts repeatedly. Sometimes when we suck air in really fast we make the “hic” sound. I know sometimes I have very loud hiccups. Sometimes they are so strong they hurt. I don’t really like the hiccups, they are disruptive. There are many remedies to get rid of the hiccups. I have one that I use and it works EVERY SINGLE TIME.
One remedy is to eat a package of sugar . . . . at least that is one that I know of. A package of sugar is less than a teaspoon. I have never tried it, but my husband, the person that told me about it, has used this method. He said it works.
My sure-fire cure for the hiccups is drinking water. The trick is to drink the water with your ears plugged. So you either need someone to help you or you need a straw. Plug your ears and drink through the straw or have someone plug your ears for you. I drink as much water as I can before I have to take a breath of air. They go way . . . . every time. I have never had this method fail me.
What is your method? Or what have you heard of? What have you tried that didn’t work?
On an unrelated note — please remember my Nia Class in Los Gatos where I will be collecting donations for the American Cancer Society – Relay for Life is April 17th. If you are local, I hope to see you there.
Posted in Helpful Hints, Misc | Tagged: contracting diaphragm, diaphragm contractions, disruptive hiccups, donations for American Cancer Society, hiccup, hiccup cure, hiccup remedy, hiccups, Los Gatos Nia, loud hiccups, Nia class, Nia Los Gatos, painful hiccups, Relay For Life, sugar hiccup remedy, workout in Los Gatos | 6 Comments »
Posted by terrepruitt on March 22, 2011
 I’ve mentioned that one day after Nia Class I learned one of my students is a licensed Naturopathic Doctor. How I learned that, she told me to try the Wet Sock Treatment. She also gave me a homeopathic medicine called Trauma. The box says it is for temporary relief of pain and inflammation from injuries, muscle sprains and pulls, bruises and trauma. I said I would try it even though I am a fan of Zheng Gu Shui. I have been wanting to post about this since I got it because it is pretty awesome. I am a fan of it too.
It is so nice because unlike Zheng Gu Shui it does not have a scent. It also does not stain anything. It also is not drying. I think it actually moisturizes. It is a cream so it is much easier to apply than Zheng Gu Shui which is a liquid. It is so scent free and residue free that I would often put it on after I got in bed and would just go right to sleep without even bother to wash my hands.
 It has arnica in it and I have been told that arnica is great for bruises and it helps with inflammation. It has many other flowers and herbs, including witch hazel, chamomile, and echinacea. I would recommend people try it if they have the need for an ointment of this type.
This “problem” with it is according to the package and the website it is only “available through licensed providers and pharmacists”. Maybe that means you can actually get it at a pharmacy. I didn’t even think to look. Well, if you are interested in trying a homeopathic medicine that has no scent yet gives great relief maybe you can check.
Posted in Helpful Hints, Misc | Tagged: arnica, chamomile, echinacea, homeopathic medicine, Naturopathic Doctor, Nia, Nia class, Nia fan, ointment for bruises, ointment for sore muscles, Trauma, trauma cream, trauma ointment, witch hazel, Zheng Gu Shui | 9 Comments »
Posted by terrepruitt on February 3, 2011
Just recently, I learned that one of my Nia students is a Doctor of Naturopathic Medicine. She has been attending my Nia classes for about two years and when I first met her she said she taught Pilates, so I thought that was her primary job. It is actually funny because I have been looking for a holistic doctor. One day after class she asked how my toe was doing and said something like, let me think about it and see what I have and I’ll let you know. I thought, ok. The next class she brought me a sample of something and a homeopathic treatment/instructions where it stated she was an ND. Ha, the things you learn.
Anyway, the second I got home I looked for cotton socks and wool socks. We didn’t have any that I could accurately identify. And I really didn’t think that walking around shopping was the best thing for my foot/toe. There were times that I had to do things, as in get groceries or take care of some bank business, but shopping was not a high priority. I waited until I could enlist the help of mom! Yup. She ran around and got me some wool socks.
Anyway . . . the therapy is this:
1. Warm your feet, either by soaking them or by taking a bath.
2. Dry your feet.
3. Wet a pair of cotton socks. Make sure they are completely wet with cold water.
4. Wring the socks out so they are not dripping.
5. Put the socks on. Yes! Put the socks on your nicely warmed feet.
6. Cover the cold wet cotton socks with the dry wool socks.
7. Go to bed! Cover up like you normally would.
All of the various instructions I have read said to make certain that you don’t get chilled. So the idea is to put the wet socks on, then the dry socks and go directly to bed.
When you wake up the socks will be dry and your feet warm.
This treatment is said to aid with congestion and upper respiratory infections. Information says it helps with headaches, migraines, colds, infections, sore throats, ear infections, cough and bronchitis. Also, helps with cold feet due to poor circulation. Some things say it helps relieve pain and promote healing.
Since your feet have cold wet socks on your body has to keep your feet warm so it sends the blood to your feet. This wet sock therapy gets your blood moving!
I found it made my feet really soft. Same as putting lotion on then putting socks on. I found that I slept really well. At first I was thinking of this treatment as just something to do for my toe, but now that I actually tried it. I can see how it could help with other things. It was a momentary challenge for me to think of putting on wet socks, but then I realized my student wasn’t just making this up to help me, this is a TREATMENT. It just took me awhile to get the right socks. Neither my cotton nor the wool socks are 100% but they are as close as we could find. I would think the higher the percentage the better.
The instructions I’ve read suggest you do it at least three nights in a row. I did that. I was too tired on the fourth night, which I think is good, but I might try it again tonight. I think it really helped. Oh, also, I skipped the warming step. I started at #3. Maybe if my feet were cold in the first place I would warm them first.
So what do you think? Are you willing to try it? If you do, please let me know your results.
Posted in Helpful Hints, Misc | Tagged: cotton socks, Doctor of Naturopathic Medicine, holistic doctor, homeopathic treatment, ND, Nia, Nia class, Nia students, Pilates instructor, wet cotton socks, wet sock homeopathy, wet sock therapy, wet sock treatment, Wet socks, wool socks | 16 Comments »
Posted by terrepruitt on December 23, 2010
People that are interested in being “green”, remember this is the season of tremendous waste, so if you can reuse, recycle, and don’t waste.
In the period between Thanksgiving and New Year’s, American households generate 25% more waste. That’s about 1 million extra tons of trash each year, according to the Environmental Protection Agency. That includes everything from food to wrapping paper, holiday decorations, packaging, and old cellphones and laptops that are unceremoniously dumped . . . .(copied directly from CNNMoney.com)
Be creative with your wrapping.
-Use newspaper
-Use the packing paper that came with the shipped gift.
Have the kids draw on it to make it special.
-Use some of the kids drawings.
From what I understand kids come home with a least ONE drawing everyday. Take a picture of it so you will have it forever, then pass it on to someone special. Use it to wrap gifts, or use it to cushion a gift.
You know I am a fan of shredding used gift wrapping paper to use as pretty packing in gift bags or boxes. Well this year I in additions to shredding that already used paper I just used it as packing paper. I just crumpled it and put it around the gift and cushioned the item with it. I thought of taking a picture to use in this post, but I didn’t want to take a chance the receiver (of the gift) would see.
One of my friends on FB said that when she sold the wrapping paper for the school fundraiser she actually used the swatched to wrap little gifts. I think that is an awesome reuse method.
My mother and I have a few cloth bags that we give back and forth. I laughed this year when I opened the box that holds my gift bags and found a note in one that said, “Give back to mom.” We will just keep it going back and forth until it can not long hold anything.
That can be both a fun and silly tradition as well as a “green” thing to do!
Then remember to save that wrapping paper and the bows you get this year to use for next year. If you are just going to shred the paper or use it for packing it doesn’t take up that much room. It can be folded.
Or use that wrapping paper to wrap some of those precious ornaments you just received.
Give a gift in a reusable shopping bag/tote. That is THREE gifts in one. You are giving a gift in a bag the receiver can use PLUS you are helping the environment. I count that as at least three.
What else? What do you do to help reduce the waste over this season? C’mon, share your ideas . . . we can always use more ideas on how to reuse!
Posted in Helpful Hints | Tagged: cell phones, CNNMoney, Core Fitness, Core Fitness Los Gatos, Environmental Protection Agency, EPA, gift wrap, green, holiday decorations, laptops, Los Gatos Nia, Nia, Nia Los Gatos, recycling wrapping paper, small gym | 2 Comments »
