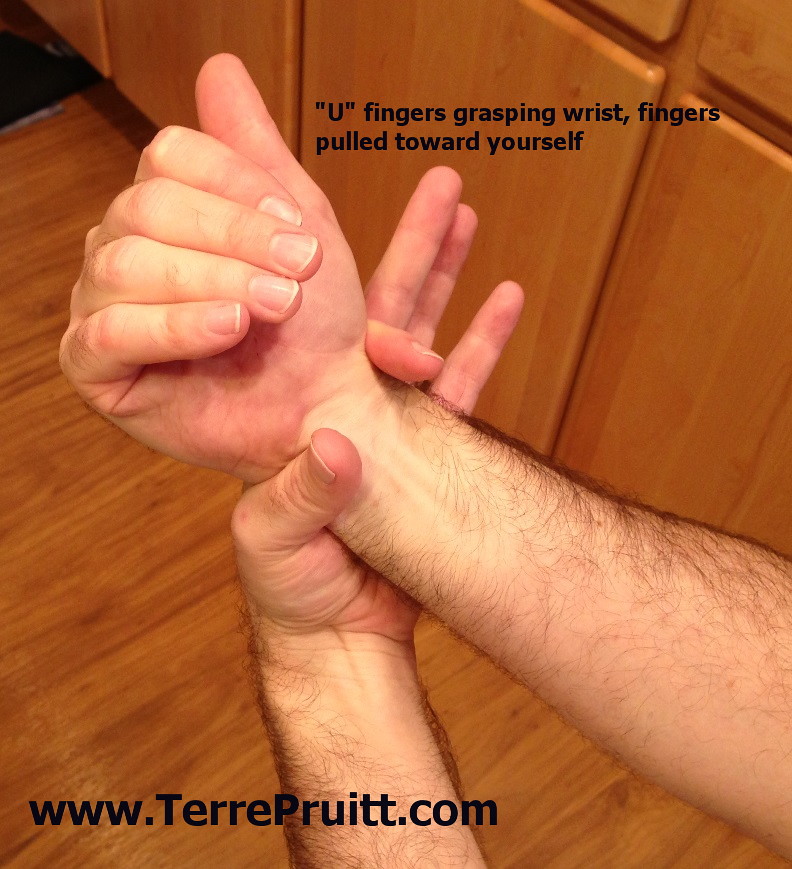
So this past Monday was a Holiday, it was Fourth of July, on holidays often gyms, yoga studios, and fitness places have different schedules. Such was the case with the YMCA on Monday. Some Y’s were closed. The ones that were open had shortened open hours and adjusted group exercise schedules. I saw that one of the YMCAs in my area had an adjusted schedule on the Holiday. It had classes that it normally does not have on Monday. And not only did they have a class I wanted to take, but it was at the perfect time! So, I schlepped myself over there to try it out. I was hoping it was the same teacher that I had taken a class from before and I could ask her if I could post about a technique she had shared in that class. It was, I did, and she granted me permission. So this post is about a pain relieving technique for the wrists.
When I took a class with her before I was trying out a new-to-me type of yoga and in that class she did a technique to help relived some discomfort in our wrists because we had done a few poses on them. She did it again in this class, although a little differently, but we had not been on our wrists as long as we had been in the other class.
She, Cindy Piccoli – a yoga instructor at the YMCA, said that her chiropractor taught her this technique. She said she had carpal tunnel and did this movement to relieve it. She said she did this frequently for two years and she no longer suffers from carpal tunnel.*
Since having done it in her class that one day, I do it to relieve aching wrists after doing poses that make my wrists hurt. I also have had my students do it after we do poses that affect the wrist in class.
It is amazingly simple, perhaps it can help you after those “wrist” poses.
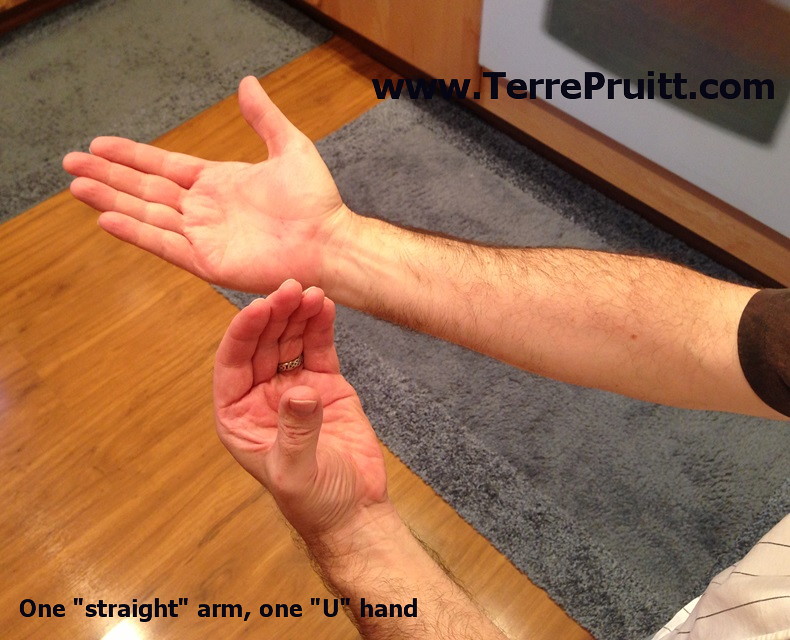
Somewhat straighten out one arm palm up. The elbow can be relaxed. Then form a “U” with your index finger and thumb of the OTHER hand.
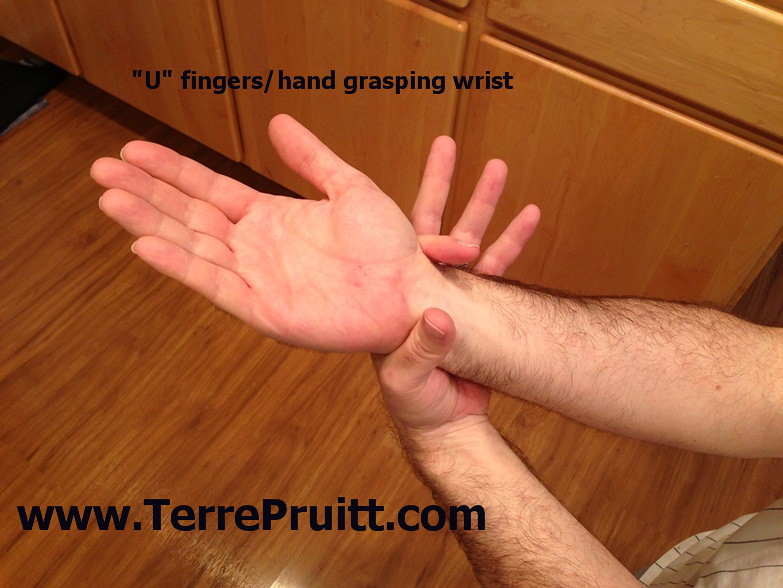
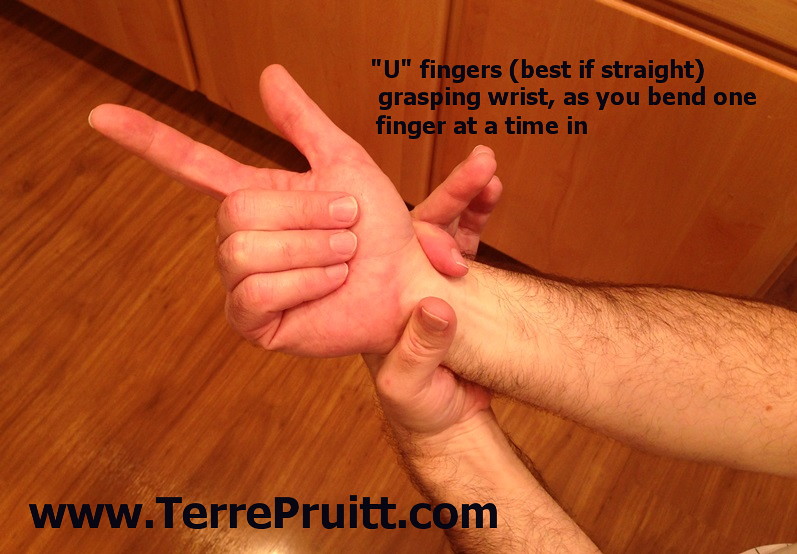
Grasp the wrist of the straight arm, right where the palm and the arm meet, and squeeze. While you are squeezing bring each finger in one at a time on the hand of your straight arm. I recommend keeping the fingers that are forming the “U” straight as that allows for a strong squeeze. (My model allowed his fingers to close around the wrist . . . )
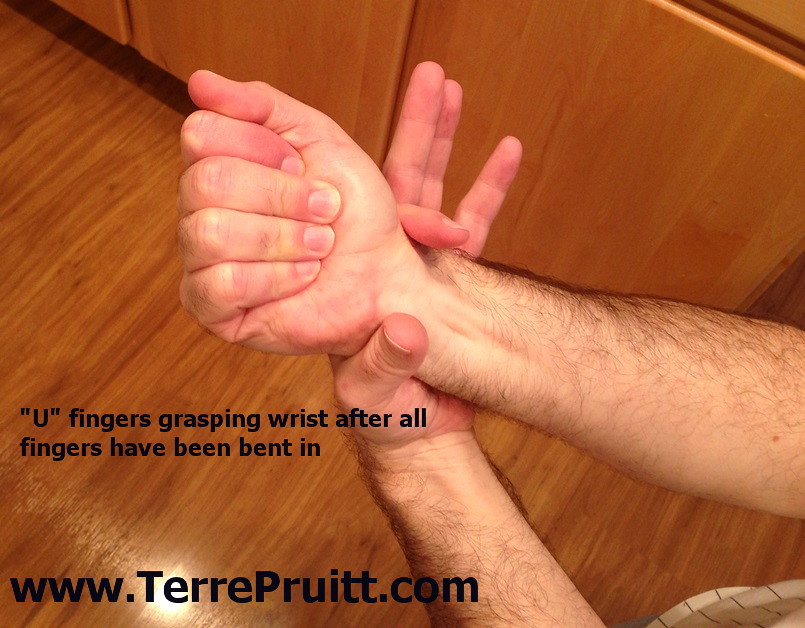
Start with the pinky, them move onto the ring finger, moving all fingers until you end up with a “closed palm”. Do that a couple of times.
Then draw your fingers toward you allowing your hand to move toward you. Straighten the fingers out, flexing the hand, then bend the wrist pointing the fingers toward you. Do that a couple of times.
If your other wrist is bothering you, don’t forget to do this on the other one.
Give it a try after you have had your weight on your wrists and see what you think.
Do you have any techniques or remedies for sore wrists?
*Keep in mind this site/post makes no claims as to this technique or any others mentioned on this site healing or curing any ailment, affliction, illness. This post is sharing an a persons individual experience.
In reviewing some of the things that actually make yoga yoga, I have been posting about the Eight Limbs of Yoga. The first two limbs, the yamas and the niyamas are restraints and observances, respectively. I am working my way through posting about them and I am on the last of the yamas. The fifth yama is one that probably speaks to many of us. The fifth yama is about non-coveting, non-hoarding, non-clinging, non-possessiveness, non-greediness, non-grasping, etc. You get the picture. The fifth yama is aparigraha.
I think this is a big one in our have-to-have-the-latest-and-greatest-of-everything society. We covet the new electronic gizmo our neighbor has. We buy more than we need until our closets and garages are over flowing. We have so much stuff that there are places we can rent to store the stuff that doesn’t fit in our homes. We cling to the very idea that our lives will be better with more stuff. We are compelled to consume. And all of that is if we are just talking about material things.
There are other applications of aparigraha, just like with all the limbs and the other yamas, much could be and has been written about them. I am just barely scratching the surface. Another way to think about aparigraha and the “non-clinging” is letting go. Perhaps we cling to things that no longer serve us, whether they be ideas or habits or even long standing customs. Does everything we do serve us now? Could we learn more if we let go of something we have always thought to be? Would our lives improve if we didn’t do that thing that we have always done?
Another way it could be applied is to people or relationships whether we look at it as letting go or non-possessing. We might need to let someone go, a relationship that is no longer serving us. Perhaps we have just grown apart or we realize that the relationship is just not a healthy thing so we need to let go. Or, more directly related to teachers in my line of work and students, perhaps we need to let them go. We need to not think of students as ours, so when they visit other classes we are not offended. When they move on to different teachers we can practice aparigraha, by not getting hurt because they were “our” student. No matter the reason they moved on, we can happily let them go to move on to what is best for them.
I liked that example of the fifth yama very much. It is a great thing for me to remember and try to practice. I mean I already know about the rest and I seriously need to work on it – as evidence by my closets. But I liked the different way to look at it, too. I always feel funny saying “my” students because I don’t mean for it to sound like they are MINE, especially since at the Camden Community Center, where I have a bulk of my classes the students are students to many instructors.
As is the case with all the yamas, I need to work on this one. I am planning on practicing it big time as I do some Spring cleaning. Going to try to not-hoard, as is my habit with clothing. Might (notice I say might) part with more of my mom’s clothing, which I probably never will wear, but I was clinging to – for many reasons.
How about you? Do you have anything (whether it be a material object or an idea, habit, or custom) that you might practice aparigraha with?
Mind Body Zone in Fremont is having a weekend of FREE yoga classes. The schedule is as follows (note only the classes listed below are free):
Saturday, February 27, 2016
3:30-4:30 Vinyasa Yoga
4:45-5:45 Yin Yoga
Sunday, February 28, 2016
10:30-11:30 Hatha Yoga
11:40-12:40 Gentle Yoga
2:15-3:15 Intro to Yoga
3:25-4:25 Restorative
Since it is free, it might fill up fast, so be sure to reserve your spot at the online sign-up website for the studio. You can use the date field or calendar tool to get to the correct dates, then sign up for whatever classes you want to attend. (Note: ONLY the classes that are indicated as “FREE” are free. There are other classes that are being taught that weekend that are not free, so if you are wanting to take the FREE classes, please be sure to sign up accordingly.) 🙂
Bring your own yoga mat or rent one from the studio. Bring water or purchase a bottle from the studio. If you are planning on taking more than one class you might want to bring a snack. It is up to you.
Keep in mind these classes are kinda like a Nia Jam, each class will be taught by three or four teachers per class. And they are new Graduates of Yoga Teacher Training.
Sign up now, so you can join the fun!
Mind Body Zone: 3335 Seldon Ct, Fremont, CA 94539
(a couple of blocks down from Fry’s right off of 680)
As you may know, there are thousands of yoga poses. Some of those may be variations or modifications, but still, there are a lot of yoga poses. I think of them in four categories; standing, sitting, lying down, and kneeling. Some people break them into different categories or types: standing poses, forward bends, back bends, twists, balances, and inversions. Or even standing, twists, sitting/forward bending, supine/prone, inverted, balancing, and back bending. To me you can do a forward bend while standing or sitting. Same with a twist. Balancing can be done standing, sitting, or on knees. Lying down is generally supine or prone. Inversions can be done lying down or standing, and the same with back bends. Within the four categories I named, I think of asana in terms of what are we doing. Are we balancing, are we stretching, are we working on strength or is this a restful pose. So sometimes those are my categories. It just really depends. Sometimes seated poses might look easy, but they might be more involved than you first realize. It might appear to be a restful pose when in fact it is a strengthening pose. One of those poses is Dandasana or Staff pose.
The staff pose is a sitting pose. It might be considered somewhat restful, but you are using your muscles. You are activating quite a few. This pose might not be done often on its own in yoga classes, but it is a base or starting point of many poses.
This asana is simple, yet it might not be easy. The pose requires you to sit up tall with a straight back. You want to sit on your sitz bones. Your weight is evenly distributed over both bones. Your legs are extended straight out in front of you. Your legs are together, thighs, knees, ankles and feet, together. Your thighs are active. You are actively pressing your legs gently into the floor. Your knees are facing the sky. Your feet are flexed with toes pointing up to the sky. Your spine is lengthening. You are reaching with the crown of your head to the sky, lengthening the neck, opening the chest, allow shoulders to relax, shoulder blades sliding down into your back pockets. Your ribs are lifting up, away from your hips. One way to do this pose is to press into the floor with your hands, arms are straight.
Using your hands is a variation or a modification . . . depends. Pressing into the floor would give you tension in your arms allowing them to work. But using your arms might be a modification because your arms might help you keep your spine straight allowing your core muscles to work less.
Another modification would be to sit on a blanket. That might be more comfortable for your sitz bones. Another modification would be to sit up against the wall. This could be a step one might take if they need to build up core strength.
This pose is said to have the following benefits:
–strengthens muscles of chest, shoulders, and back
–tones abdominal organs
–improves digestion
–reduces heartburn and flatulence
–tones the spinal and leg muscles
–lengthens ligaments of the legs
–stretches and activates muscles of legs
–relieves sciatica
–improves posture
As I mentioned this post is the base of many poses. The lengthening of the spine and legs is the start of many asana. Some even keep that energy, the energy of the legs moving away from the hips and/or the energy of the head moving away from the hips, throughout the pose. So this is a great one to master to help with other asana.
Many of you who attend yoga classes regularly might already know this, but then again, maybe not. Sometimes there is not always time in any type of group exercise class to get the tips and tricks that are widely known. As with me, I just recently learned this tip/trick. And, I actually haven’t even had the chance to use is since I learned it. This might not always be necessary even if you are using the same type of prop in a yoga class. There are different uses and needs, so you might not always need this trick. Recently I was in a yoga class and we were instructed to lie down on a specific configuration of blankets and blocks for pranayama. The blanket was folded length-wise into thirds and we were to lie on it length-wise, with it running from the bottom of our neck to tail. The idea is to allow the torso and chest to open. We were to lie there and breathe. As you may know, pranayama entails deep breathing and/or breathing specifically. I think the pranayama we were supposed to be doing was three-part breath (Dirgha). Where one is breathing into the belly, the rib cage, then the upper chest. Then the exhale goes from upper chest, ribs, then belly. Something I am just learning and that is not easy for me. So, like I said before, breathing specifically. Well, I could not concentrate because I was so uncomfortable. I couldn’t even take a full breath much less take it in from bottom to top and then breathe it out in the opposite fashion. The blanket was bulky on the sides and it was keeping me from breathing with ease. I couldn’t relax and let my chest open. I ended up having to discard the blanket and just lie on the floor.
After that portion of the class another teacher came in and explained how to fold a blanket to allow for maximum comfort. It is easy and made complete sense. Instead of folding it in halves or thirds like you would a blanket you are going to put in the closet, fold it like an accordion so that it is even. There are no sides that are thicker. When it is folded like an accordion it lies more evenly. This is a much easier, more comfortable support to lie on. When she demonstrated it, it looked perfect and comfortable. I wanted to use it to see if it felt as comfortable as it looked, but it was not the time to do so. And, as I mentioned, I have not yet had the opportunity to try folding a yoga blanket like that and using it.
I know, folding a blanket is an easy thing to do, but, as you may know, yoga blankets are very thick and sometimes they can be very bulky and bulgy when folded wrong. The blankets and other props are there to be used to make poses more comfortable and give proper alignment. Having it bulge and press on your body is not comfortable.
Do you use yoga blankets in your practice? Might you see how this type of folding technique could create a comfortable platform to lie on?
There are poses and moves that I love to do that I don’t get to do in my classes. Some of the poses or moves require a wall. While there are walls in the venues where I teach, they are not always accessible. Some walls have mirrors and most venues ask people to NOT TOUCH the mirrors. Some walls have chalkboard, white boards, cork boards, and other types of boards where announcements are hung. It is not feasible to use the walls with the boards, because we would be touching and possibly damaging the announcements. And some walls have cabinets and sinks, so that doesn’t work. Some walls aren’t really WALLS at all, but they are windows, that is almost the same as mirrors in that we shouldn’t be pushing on them and putting our hand prints all over them. And for some poses it wouldn’t just be hand prints — it just wouldn’t work. Some walls have ballet barres attached to them so they wouldn’t work for the poses or movements. And some walls just have too much stuff in front of them to be used. So in the majority of the classes I teach we don’t use the walls, which is a bummer. One pose that I have been doing a lot lately on my own is a great one, but it requires a wall. The name is actually “Legs up the Wall Pose” or the relaxed version of Viparita Karani.
Basically for this pose you lie down on your back with your buttocks up against the wall and your legs straight up on the wall. The benefits of this pose touted by practitioners of yoga are many. Including calming the mind, easing anxiety and stress, relieving tired feet and tired lower legs.
I find that I am comfortable in this position for about 15 minutes. If I am going to stay in this position longer than 15 minutes I like to lie on something, like a folded towel. I place the folded towel under the lowest part of my back.
This is a relaxing position and should feel very comfortable, so adjust your body in order for it to be comfortable for you. That could mean moving your body away from the wall, so your buttocks are not touching it. Move as far away as you need to in order to relax and still be in the pose. Or it could mean using a bolster under your buttocks and lower back or a towel under your lower buttocks. Move and adjust yourself and any prop you are using to find something relaxing and comfortable for you. You may even want to put a rolled towel or something under the arch of your neck for support. Stay in this position as long as you are comfortable. Be aware of your feet and any sensation you may have. I usually roll out of the pose when my feet get tingly.
In some styles of yoga Viparita Karani is done with the legs in the air and a support device or your hands supporting your lower back with elbows bent. This version gives you the benefit of the legs being higher than your heart, but it is not as relaxing and restful as with your legs against the wall.
If you are in good health and cleared to do yoga and inversions, I would recommend this pose. It is great for relaxation. I have been doing it before I go to bed.
Are you familiar with this pose? Have you ever tried this pose?
I had started writing a different post, a post about a yoga pose I am enjoying lately and wish I could do in my classes. But as I was cooking dinner my husband came into the room laughing and saying that Hulu finally had a good commercial. I totally judge commercials. Since I am forced to have them play, I sometimes watch them. When I watch them, I judge them. Currently I am convinced that a specific car company thinks it has very unintelligent owners/drivers – or that is at least the way the commercial portrays them. And Jack-In-The-Box is brilliant! Sometimes I enjoy commercials, and now, on Hulu there are two commercials that are super funny – at least to me and my husband. The commercials are for hot dogs.
They are old commercials, uploaded to Youtube in 2012, but I am just seeing them now. Applegate – Natural and Organic Meat is the maker of the commercials or, more accurately, the product that the commercials are advertising is hot dogs.
The one I saw first was this woman sitting at her dining room table interviewing a cow. The “cow” was a man, a huge muscle man in a cow costume. They call him Mooscles. She tells him she is looking for a natural hot dog made of beef without hormones. He claims he does not use hormones. She asks him if he uses growth hormones and he says no. She then tells him there is a needle sticking in his haunch. He looks at it and say it is not his.
In the other one a woman is in the store holding a package of hotdogs and the cow approaches her and ask her if she is looking for quality meat and she says she thinks she found it and he says, “Yeah, you did,” while flexing his pecs. She says her family prefers all natural beef. He says his does too and he points to his kid. The “calf” is the same guy in a shopping cart. And the “cow” says, “They grow so fast.” This one is not as funny to me, but the point is funny, I think. Especially since that is what growth hormones do, make things grow larger than they normally would and at an accelerated rate. When the commercial shows the product name it states “The cleaner wiener”. Too funny!
I told my husband that I thought the commercials were so funny I was going to write a blog post about them, but I changed my mind. He thought they were funny enough for a post. So I changed my mind back!
That is one icky part of Hulu, so far it seems that they run the same commercials for ever break for a few weeks. I am so tired of a specific insurance commercial, yet, I honestly couldn’t tell you the company. Ha, annoying advertising is not always effective.
Do you ever pay attention to commercials? Do you like some more than others? Do you have a favorite commercial?
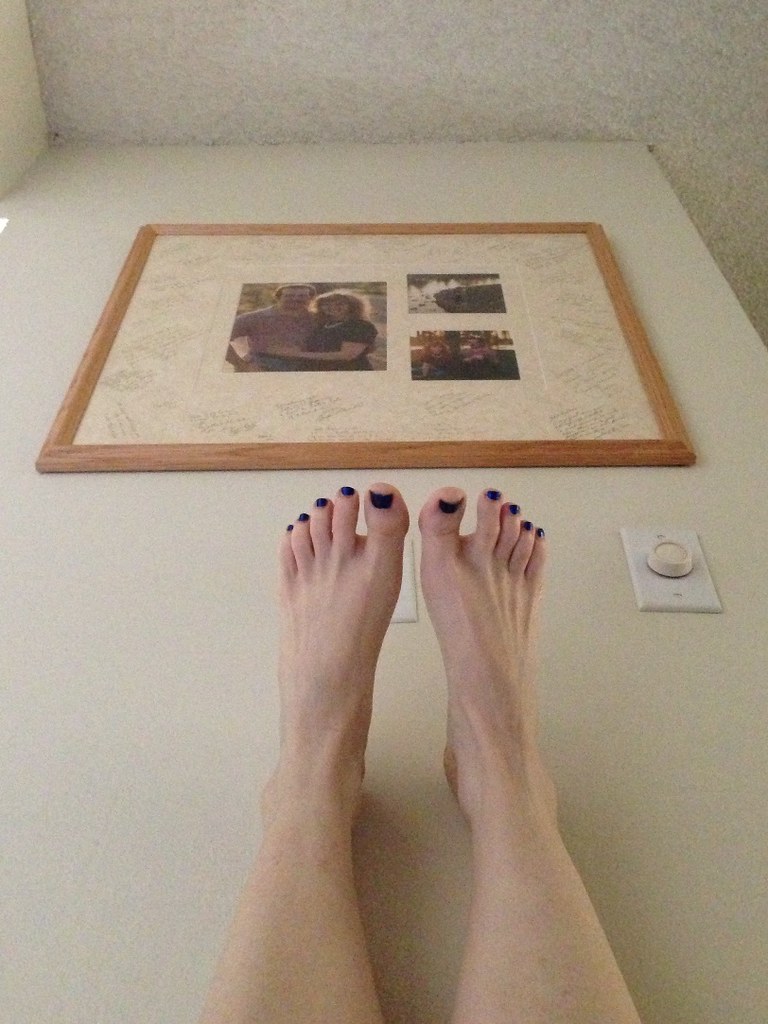
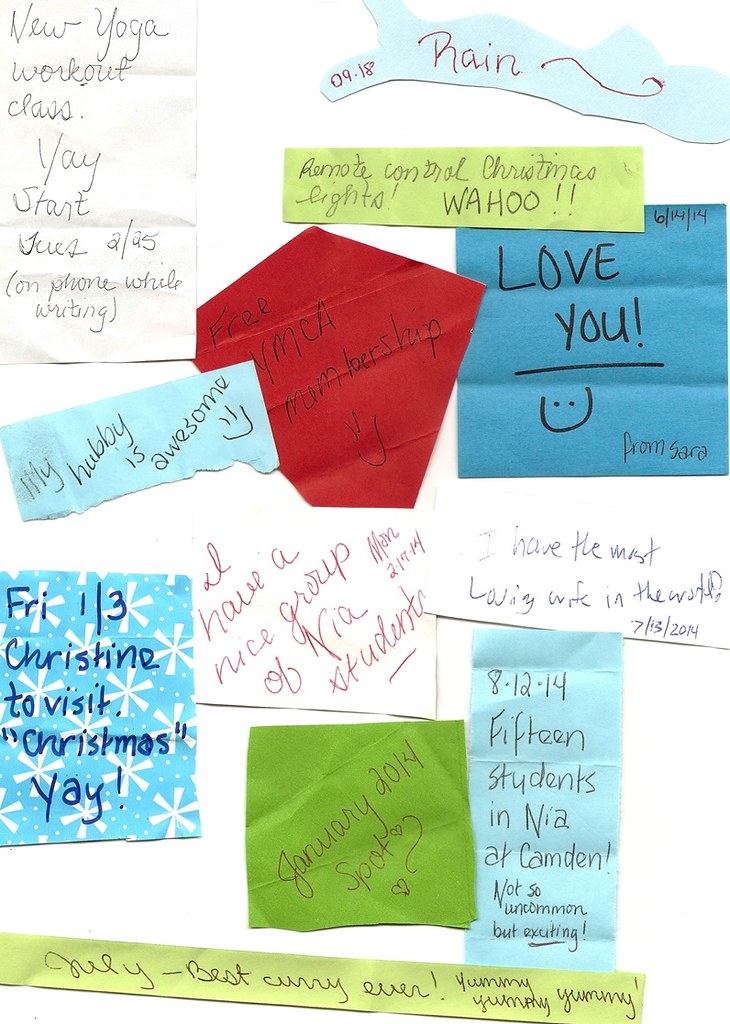
This year we were lucky to have a visitor for our Goodie Jar reading. My niece was visiting and she helped us relive the moments that made us smile. I am a smart enough aunt to know that I have an amazing niece so she was mentioned often in my notes of “Good Things”. Here are some of the highlights from the jar:
~My niece treated us to the Nutcracker Ballet in San Francisco
~Nightingales
~May 29, (2014) was the first “coffee” visit with they Camden Community Center Nia Class
~Wicked
~Colleen came to say goodbye to Spot (06.24.14)
As you can see from the pictures there were a lot more. I’ve had some people ask me what to put in the Good Things Jar. It really is up to you. I am seeing a lot of different versions of “jars” this year so I really think it all depends on you. What do you want your jar to do? The point of my jar is to keep me focused on the GOOD THINGS IN LIFE. There are so many things that can be considered “not good”. It is very easy to get distracted and end up with a negative attitude and to forget all of the blessings that are around us. So, for me, it is a way to keep the blessings in my life at the forefront. That does not mean I can’t be sad or get mad or pout . . . .or whatever . . . it just is a reminder to not stay sad, mad, or pouty. Because that — to me is an insult to the good stuff.
There is another benefit to my Goodie Jar. In addition to making a note and helping me stay focused it really is fun for me to read the good things at the end of the year and to remember. While my family might not enjoy it as much as I do . . . they tolerate it. I even tell stories regarding some of the GOOD THINGS, if they will let me.
I have mentioned before in posts that I like to use different types of paper. I like to fold them in different shapes and ways. It makes the jar look festive. I noticed last night that the ones my niece grabbed to read were the spiral ones, the ones folded in shapes, or the really festive looking. Yeah, it is fun.
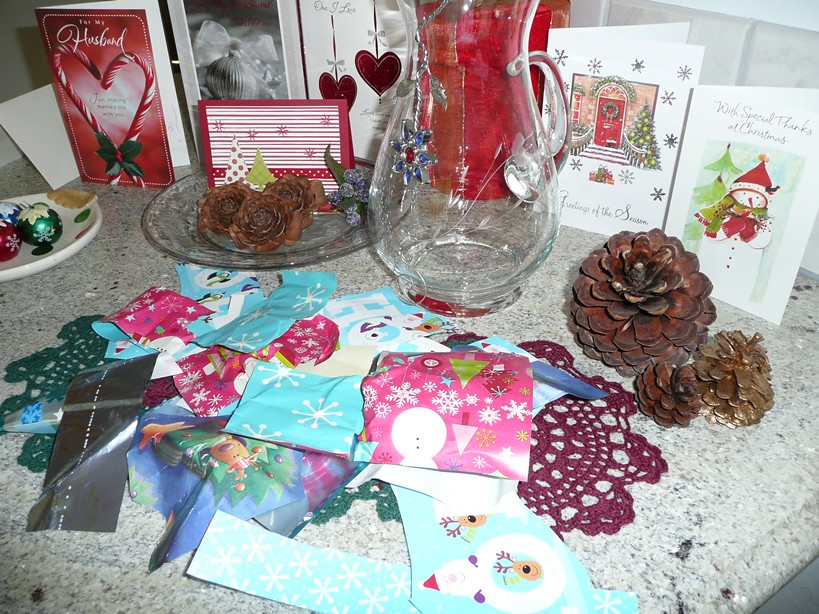
Also pictured here is this post are the pieces of paper we are going to use to fill up the jar in 2015. Yeah, it started off as a one-time thing, but this will be our third year of doing it. I am really loving this tradition. I love the practice throughout the year. I love the decorative jar that sits out all year round reminding me that there has been good things. I love the “ceremony” (to me it is) of reading the good things.
I wish I could remember the origin of this aside from Facebook. I mean, I know WHO I got it from, but I don’t remember where/who SHE got it from. But the Good Things jar was not my idea. Using a beautiful pitcher is my idea and filling it with different types of paper is my idea. Re-using wrapping paper . . . my idea. But the original idea . . . . don’t know. But THANK YOU!
So, what good things have happened to you in 2014? Do you have a Goodie Jar? Are you going to have one for 2015?
I like this pose, Utthita Hasta Padasana (Extended Hands and Feet Pose). It is an easy pose. It is one of those asanas that can be used in so many places in a yoga routine. It can be used in the beginning to allow you to “come into your body” and start the process of concentration. It can be used in between other poses, either to rest or reset, or to allow for an easy transition. It can be used at the end. It can be used to help practice awareness and learning sensations in your body. I often use it as part of the cooldown in my Nia classes. It is basically something almost everyone can do. Sometimes it might present an initial challenge for some needing help with balance, but after a bit it becomes easy. I like it. It is very versatile.
Generally no matter when or where in the routine this pose is placed in my current yoga classes we do not hop into it. We step into the wide stance. The feet are beyond the width of the shoulders. If we have come from a mountain pose then we continue with our reaching, lengthening, relaxing, and lifting, but if we are stepping into this from another pose then we check our posture. We want to reach with the crown of the head to the sky, lengthening the neck – creating space between the ears and the shoulders, we allow our shoulders to relax and our shoulder blades to “drip” down our back, we lift the ribs off of the hips, and lift the knee caps by activating our thigh muscles. The feet – in the wide stance – are parallel to the edges of the mat and each other. The chest is open. Arms are stretched out to the side, elbows and hands are at an even height with the shoulders. We are reaching for the opposite walls.
Standing there you open your chest and create space in the joints. Reach up to be taller and reach out to be longer. The head reaching up, the arms reaching out. Feet are firmly planted, weight is evenly distributed over the entire foot (both feet), toes are spread. Here is where you sense the strength and stability while opening.
This pose is traditionally done from the mountain pose with hands at chest level, finger tips touching in front of the heart center. Then when you hop your legs into your wide stance you put your arms out at the same time. In order to be “gentle” we step into our Utthita Hasta Padasana.
Many yoga poses are challenging. Many test strength, many test balance, many test flexibility. The ones, like this one might be very easy so the possibility that they are over looked and not practice in many yoga classes could be very high. But it is the easy asanas where sometimes we learn the most. We learn to take a moment to sense the body. What does it feel like to stand wide, reaching and lengthening? What is the sensation in my bones? What is the sensation in my muscles? Can I open my chest any further? Can I make my arms longer? Check into these sensations. Allow yourself to learn and become familiar so that you can do more challenging poses with the body knowledge you have gained from the easier poses.
Do you do this pose as part of your practice? Do you do this pose in the yoga class you attend?
Wow, you might not believe I have more “stuff” going on. More on that later. I am sure I will write a post or two. You know I always share, it just takes some time sometime. So, instead – highlights of my day: a student who has been away from my Nia classes for a bit came to class today. That was wonderful, unexpected and very timely. Another student in one of my yoga classes came to class with his own mat. That put a huge smile on my face. I took that as a sign that he is “into” it. Later when I told him I was so happy to see him have his own mat, he said, “Yeah, I got to stick with it!!!!” Thrilling! Yes, gotta keep looking at the bright spots. While perusing my cache of “topics to post about”, I came across one I found interesting. Could be something you are aware of, perhaps I had heard of it too, but forgot. I think the studies were done in 2009. Did you know caffeine could, possibly, help people with asthma breathe better?
There is an article about a small study showing caffeine worked as a bronchodilator. “A bronchodilator is a substance that dilates the bronchi and bronchioles, decreasing resistance in the respiratory airway and increasing airflow to the lungs.” per Wiki
The small study of 75 people with mild to moderate asthma was done. Six trails showed 55 people had improved lung function for up to fours hours after consuming caffeine.
A study at the Indiana University show that caffeine an hour before exercise can significantly reduce exercise induced asthma. I cannot find a link to the Indiana University study, but there are numerous articles about it that surface when a search is done. One article on ScienceDaily said that it was LARGE amounts of caffeine that were used in this study. The article stated “9 milligrams of caffeine per kilogram of body weight”. Ok check my figuring on this using the information from the Mayo Clinic regarding a regular brewed cup of coffee, which is 8 oz brewed coffee has 95-200 mg of caffeine. That is a big difference, but that is ok, it will still work in my “figuring”. Let’s use the top, 200 mg of caffeine in a cup of coffee. Well, lets say average man is 80 kilograms (176.37 pounds), that would be 720 mgs of caffeine. That is roughly 4.5 cups of strong coffee. Is that right? The article also said that smaller amounts – 3 mg – 6 mg per kilogram of body weight “also reduced the wheezing, coughing and other symptoms of” exercise induced asthma.
Interesting. I know many people who use caffeine to help fuel their workouts. I know many people who use caffeine to help fuel their day. So, while I am by NO MEANS saying to use caffeine instead of any physician prescribed medication for asthma . . . I just think it is interesting. Since it could be that many people with asthma are drinking coffee anyway. I just like when I come across tidbits of information.